Replacing a Freestanding Cooker or Range
Freestanding cookers and range cookers are essentially the same thing — a range is simply a wider, heavier version of a freestanding cooker. Both sit on the floor between or beside kitchen units rather than fitting into a housing cupboard. Whether you're replacing like for like or changing fuel type, here are the key things to consider:
Step 1 — The Electrical Connection
The electrical requirements depend on the fuel type:
- Gas cooker — standard 13 amp plug socket
- Dual fuel cooker (gas hob, electric oven) — cooker point outlet, same requirements as a fully electric cooker
- All electric cooker — hard wired into a dedicated cooker circuit, rated at 32 or 45 amp, on its own circuit breaker. FixCookers supplies 1.5 metres of cable as part of a hard wired installation
If you are switching from gas to dual fuel or all electric and no cooker circuit exists, a qualified electrician must install one. This is a notifiable electrical job. Dependent on location, FixCookers may be able to arrange this.
When checking what you currently have, you may find one of the following:
Fused Spur
A switched fused outlet — used for gas cooker ignition in place of a normal plug socket.
Hardwired Connection Box
The correct way to hard wire a dual fuel or electric cooker.
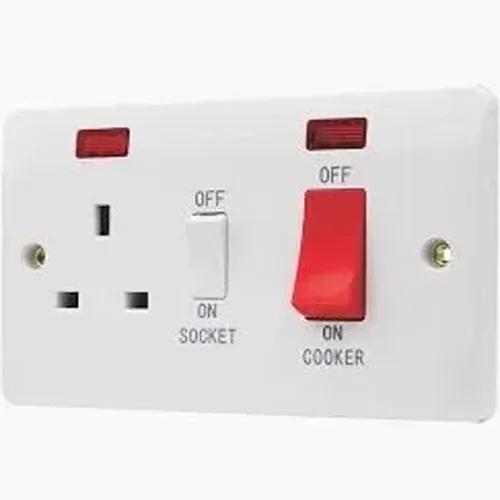
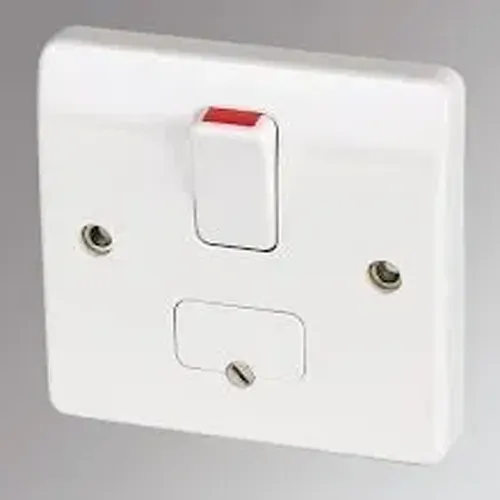
Cooker Control Unit with Socket
A 45 amp isolation switch combined with a standard 13 amp socket.
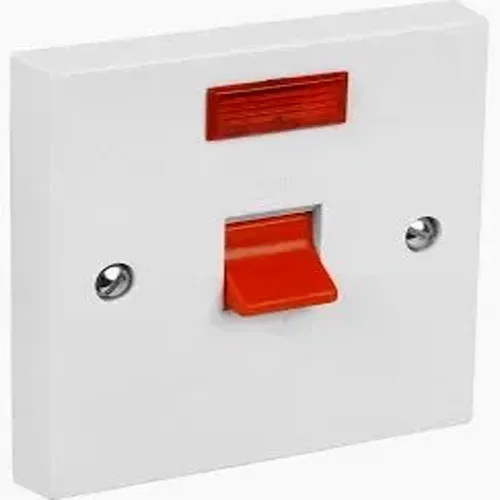
Cooker Isolation Switch
A 45 amp double pole switch with no socket.
You may also find just a grey cable — typically 6mm twin and earth — disappearing into the plaster with no connection box. This means the cable runs directly to the isolation switch. While common, this is not best practice.
Step 2 — The Gas Connection
Gas and dual fuel freestanding cookers connect via a flexible cooker hose. The cooker flex is always replaced as part of a FixCookers installation — it is not supplied with the new cooker. FixCookers also carries bayonets if a replacement is needed.
The Bayonet Connection
The bayonet is the fitting on the wall that the cooker flex plugs into. The regulations require the bayonet to be mounted at a height of 750mm above floor level, though some manufacturers' instructions permit a minimum of 650mm. The exact required height will be specified in your new cooker's installation manual.
If the previous appliance was electric, or the gas connection has been unused for some time, the bayonet will have been capped off at the backplate. Removing the cap and fitting a new bayonet is straightforward.
Bayonet Direction and Backplate Position
The gas regulations require the flexible hose to hang in a perfect U shape between the wall and the cooker. To achieve this, the bayonet must point in the correct direction — and this depends on which type of cooker flex is being used.
There are two hose sizes and two types of end fitting:
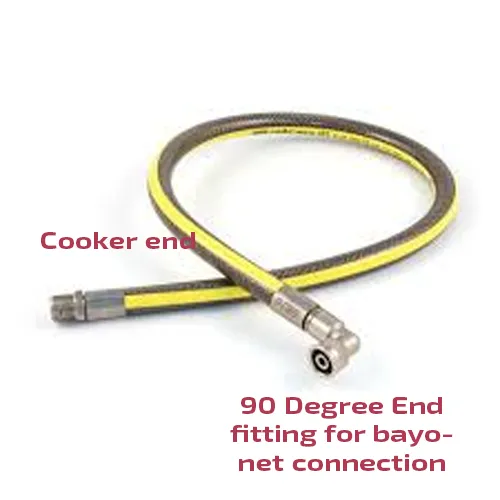
Microbore Flex — 90° Fitting
The narrower microbore hose typically uses a 90 degree end fitting, meaning it plugs into the bayonet from the side. The bayonet therefore needs to point sideways so the hose hangs down in a U. This is the most commonly used cooker flex — older versions are coloured black.
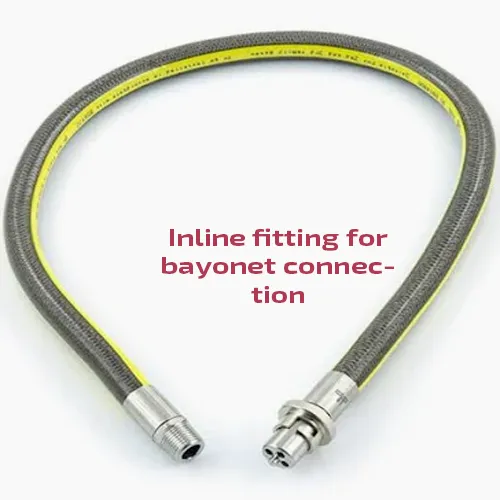
Standard Flex — Inline Fitting
The standard hose typically uses a straight inline fitting, meaning it plugs in from underneath. The bayonet therefore needs to point downwards so the hose hangs in a natural U. Older versions of this flex are also coloured black.
Backplate Position
The backplate is what the bayonet screws into and it should sit flush and parallel to the wall. However some installers fit backplates — or terminate pipework — with the threaded end pointing out away from the wall rather than lying flat against it. When the bayonet is then screwed in and the flex attached, the cooker ends up sitting further out from the wall than it should. Every cooker has a different back panel profile with different recesses, so the position of the backplate matters — if it is not sitting correctly it can prevent the cooker from pushing fully back.
Best Practice — Parallel to Wall
The backplate sits flush and parallel to the wall with the bayonet pointing in the correct direction. This is the preferred method used by FixCookers.
Protruding Backplate
A common type fitted by councils and some installers where the pipe end protrudes from the wall. Once the bayonet and flex are fitted, the cooker may sit further from the wall than ideal. This is not best practice but is workable — if already in place FixCookers can use it, which reduces installation costs.
Bayonet Types
There are different bayonet sizes to match the two flex types. Make sure the bayonet fitted matches the flex being used. Left column is microbore, right column is standard.
Microbore Bayonet
The smaller bayonet for use with microbore flex. Typically fitted sideways so the 90° flex end plugs in from the side and the hose hangs down.

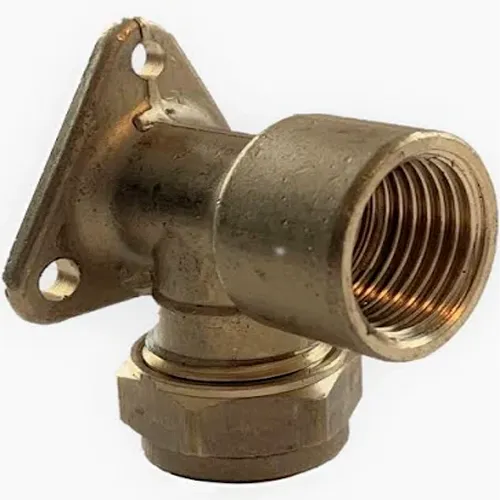
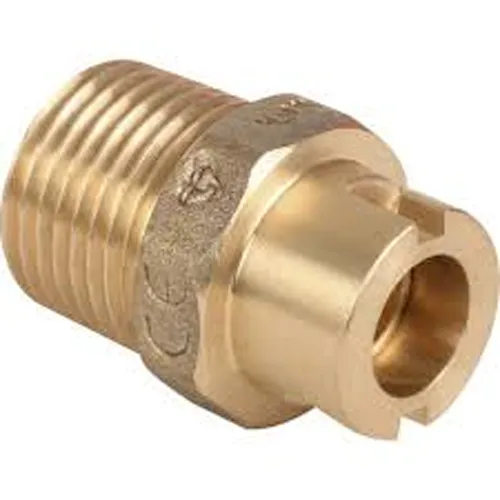
Standard Bayonet — 90°
The larger bayonet for standard flex, fitted sideways into a backplate so the bayonet end points downward, for use with inline cooker flexes. These are very common but in FixCookers' opinion not best practice. They do not always tighten securely in the tapered thread when pointing downwards and the retaining nut on top can work loose over time. They also cannot be used where the backplate sits parallel to the wall as they are too wide and foul on the wall when being screwed in. For these reasons FixCookers uses the inline bayonet instead and repipes so the bayonet points straight down.
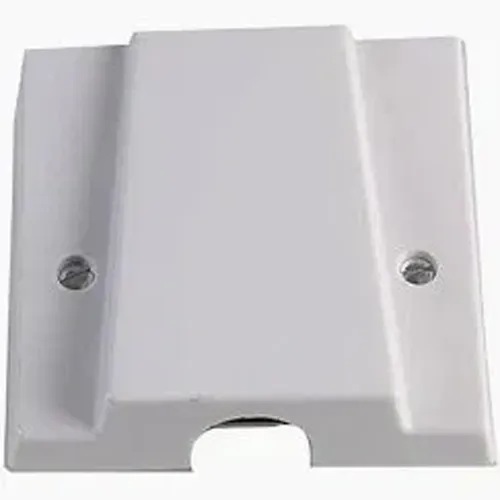
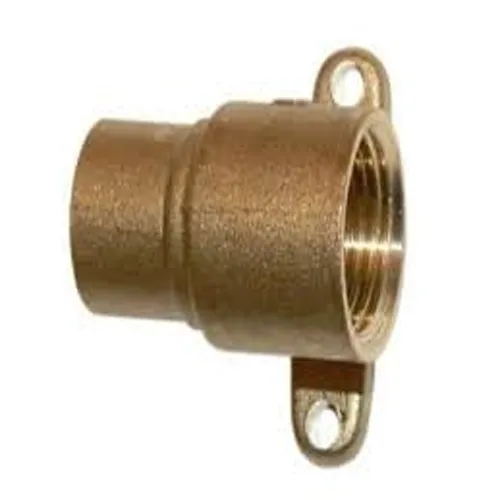
Capped Bayonet
A capped bayonet — used when the gas supply is not in use. The cap is removed and replaced with the bayonet fitting when the new appliance is installed. Note that this type of backplate faces away from the wall — once a bayonet and cooker flex are added, the new cooker may stick out further from the wall than ideal.
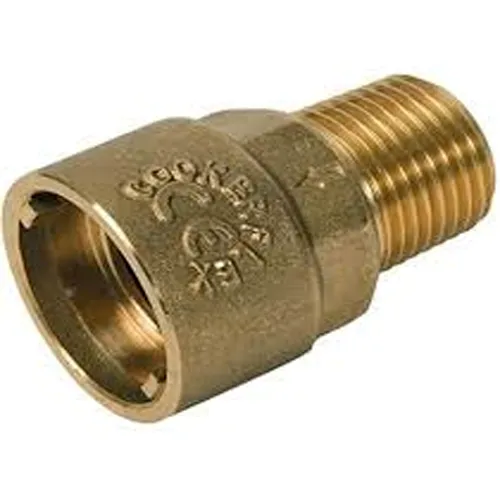
Standard Bayonet — Inline
The larger bayonet for standard flex, fitted pointing downwards so the inline flex end plugs in from below and the hose hangs in a natural U.
Correct and Incorrect Installations
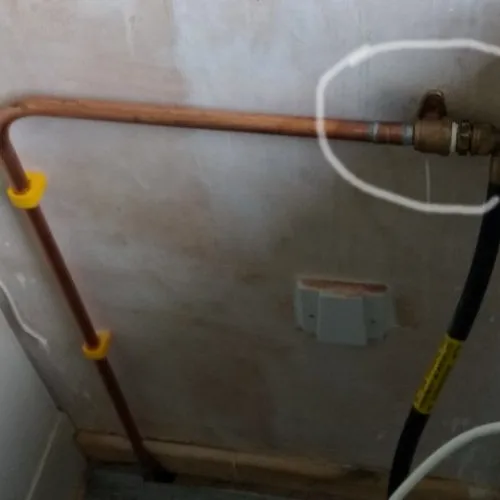
Correct Installation — Microbore
Microbore flex with 90° fitting plugging into a sideways-pointing bayonet, backplate flush to the wall. The hose hangs in a perfect U as required by gas regulations and is at the correct height.
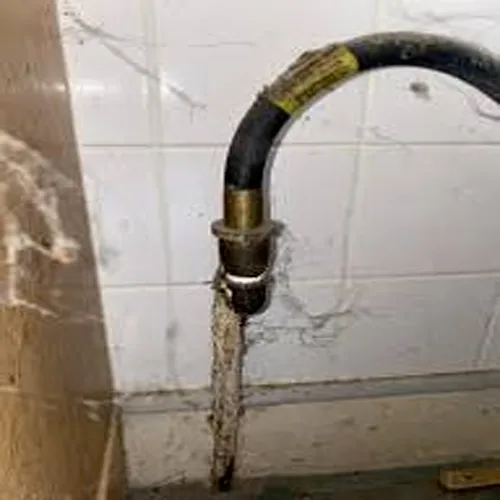
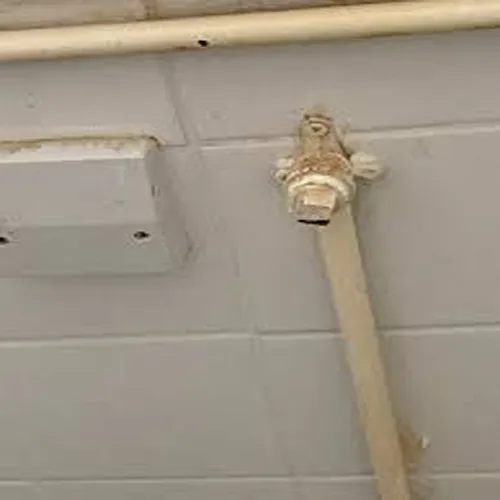
Incorrect Installation
Inline cooker flex pointing upwards into the bayonet. This is not permitted — the flex must hang downwards in a U shape at all times. An upward-pointing flex is a gas regulation violation. The bayonet is also too low, meaning the flex can get trapped underneath the cooker when pushing it back into position. A bayonet fitted at the correct height allows the appliance to be pulled fully clear of its position while remaining connected — essential for a service engineer to carry out maintenance and testing safely. When fitted too low this is not possible.
Hot Zone
Gas hobs have a hot zone — a defined area around the burners where heat can cause damage to adjacent surfaces. For freestanding cookers this is particularly relevant where the cooker sits next to a unit or wall. See our installation guide for the hot zone diagrams.
Step 3 — Size, Fit and Worktop Height
Width and Gap
Freestanding cookers come in standard widths — typically 50cm, 55cm, 60cm, 90cm and 100cm, and some models are wider still, for example 110cm. When replacing, measure the existing gap between units carefully. Some cookers require a small clearance gap between the appliance and the adjacent unit — this is specified in the installation manual and varies between manufacturers. Check this before purchasing.
Hob Height Relative to Worktop
Ideally the hob top surface should sit at the same height as or slightly higher than the adjacent worktop. If the hob sits lower than the worktop and the worktop edge is not protected with a metal strip, there is a practical risk — when large pans are placed on the hob, the gas flame can come out sideways and burn the unprotected worktop edge. Metal edge strips for worktops are available and can be fitted if this is the case — FixCookers does not supply these.
Step 4 — Stability Chains
Stability chains are a requirement for all gas and dual fuel freestanding cookers, and some all-electric models also require them. The chain prevents the cooker from tilting forward when oven doors are opened with heavy loads inside.
The chain must be fixed to the fabric of the building — typically the wall directly behind the cooker. FixCookers supplies and fits the stability chain as part of every installation where one is required.
Step 5 — Levelling
All freestanding cookers have adjustable feet. However the quality of these feet varies considerably between manufacturers — some feet do not lock when extended and can screw back in as the cooker is slid into position, leaving it unlevel or too low.
If the feet cannot be extended enough to bring the cooker to the correct height, the cooker will need to be raised on timber runners. The correct way to do this is with planks running front to back on both sides — like a pair of railway tracks — so the cooker feet can slide all the way back along them into position.
A common bodge is to run the planks side to side instead. The problem with this is that as you push the cooker back, it reaches the end of the planks and drops to floor height — then you have to lift the back of the cooker up again to get it level. For heavy range cookers this is a significant problem. If timber runners are needed, have them ready before installation and make sure they run front to back, secured to the floor.
Ready to Replace Your Cooker? Call FixCookers
Based in South Yorkshire, covering Sheffield, Rotherham and Barnsley. Gas Safe registered, 30 years experience, fully insured.

07951 899378
WhatsApp Us
